
Chicken tenders have established themselves as a beloved staple in many kitchens around the world. Their popularity stems from their versatility, making them a go-to option for various occasions, whether it’s a cozy family dinner, a party appetizer, or a satisfying late-night snack. The appeal of chicken tenders lies not only in their tender and juicy meat but also in the satisfying crunch of their crispy coating. While many enjoy grabbing a quick bite from their favorite fast-food restaurant, there’s something exceptionally rewarding about making a homemade version. The ability to control the ingredients and the preparation method allows for a more flavorful and healthier option.
Introducing the Crunchy Delight Chicken Tenders, a simple yet delicious recipe that promises to deliver that perfect combination of crunch and flavor. This recipe is designed to elevate your chicken tender experience with a delightful homemade touch that will impress family and friends alike. With the added bonus of a delectable honey mustard dip, these tenders are sure to become a favorite in your household.
Understanding the Ingredients
To achieve the perfect Crunchy Delight Chicken Tenders, it’s essential to understand the key ingredients that contribute to their flavor and texture. Each component plays a vital role in ensuring that the chicken tenders not only taste great but also have the ideal crunch that we all love.
Chicken Breast: The Protein Base
The foundation of any great chicken tender recipe is, of course, the chicken itself. For this recipe, boneless, skinless chicken breasts are the ideal choice. Chicken breasts are favored for their lean quality, which makes them a healthier option compared to other cuts of chicken. Their mild flavor allows them to soak up the seasonings and marinades beautifully, making each bite a burst of flavor.
When selecting chicken breasts, look for fresh, high-quality meat that is pink in color with minimal fat. This ensures that you have a tender and juicy chicken tender once cooked. It’s also worth noting that cutting the chicken breasts into uniform strips will help them cook evenly, leading to a better texture overall.
The Role of Buttermilk in Marination
One of the secrets to achieving tender and flavorful chicken tenders lies in the marination process, and buttermilk is an essential ingredient in this step. Soaking chicken in buttermilk helps to tenderize the meat while infusing it with a subtle tanginess. The acidity in buttermilk breaks down the protein structure of the chicken, resulting in a more tender texture that is hard to resist.
In addition to tenderizing, buttermilk enhances the overall flavor profile of the chicken. The creamy texture allows the seasonings to adhere better, ensuring that each tender is well-seasoned throughout. For optimal results, it’s recommended to marinate the chicken for at least one hour, although longer marination times (up to overnight) can yield even more tender and flavorful results.
Breading Components: Flour, Panko, and Spices
The crunch factor in Crunchy Delight Chicken Tenders comes from the breading, which consists of a mixture of all-purpose flour and panko breadcrumbs. Flour acts as a base, providing a light coating that helps the breadcrumbs adhere to the chicken. Panko, on the other hand, is a Japanese-style breadcrumb known for its airy texture and larger flakes. This unique quality gives the chicken tenders their signature crunch when fried or baked.
To elevate the flavor of the breading, a combination of spices is added. Common spices include garlic powder, onion powder, paprika, and black pepper. These spices not only enhance the taste of the chicken tenders but also add warmth and depth to the overall dish. The balance of flavors in the breading is crucial, as it complements the juicy chicken without overpowering it.
Creating the Perfect Honey Mustard Dip
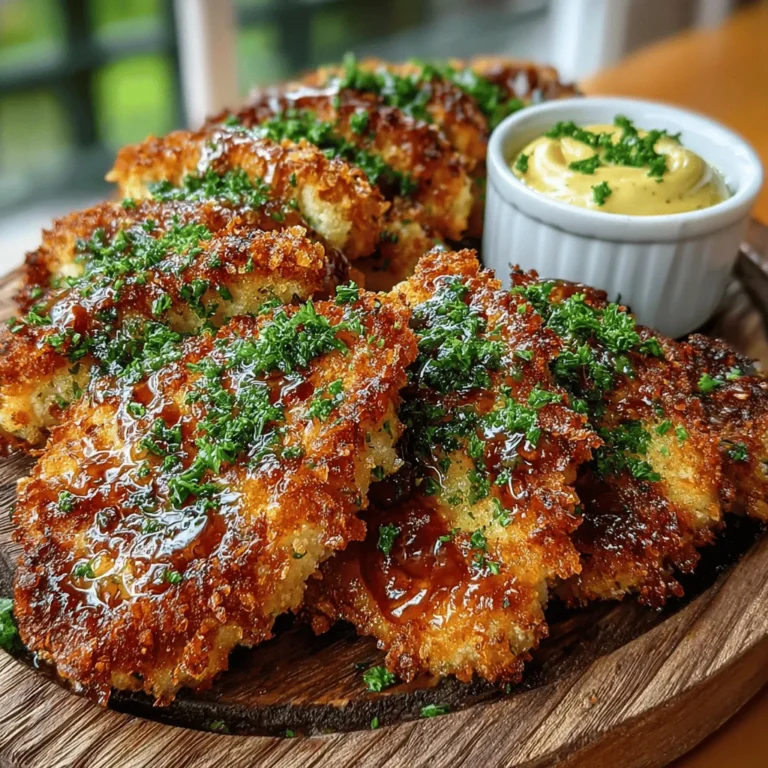
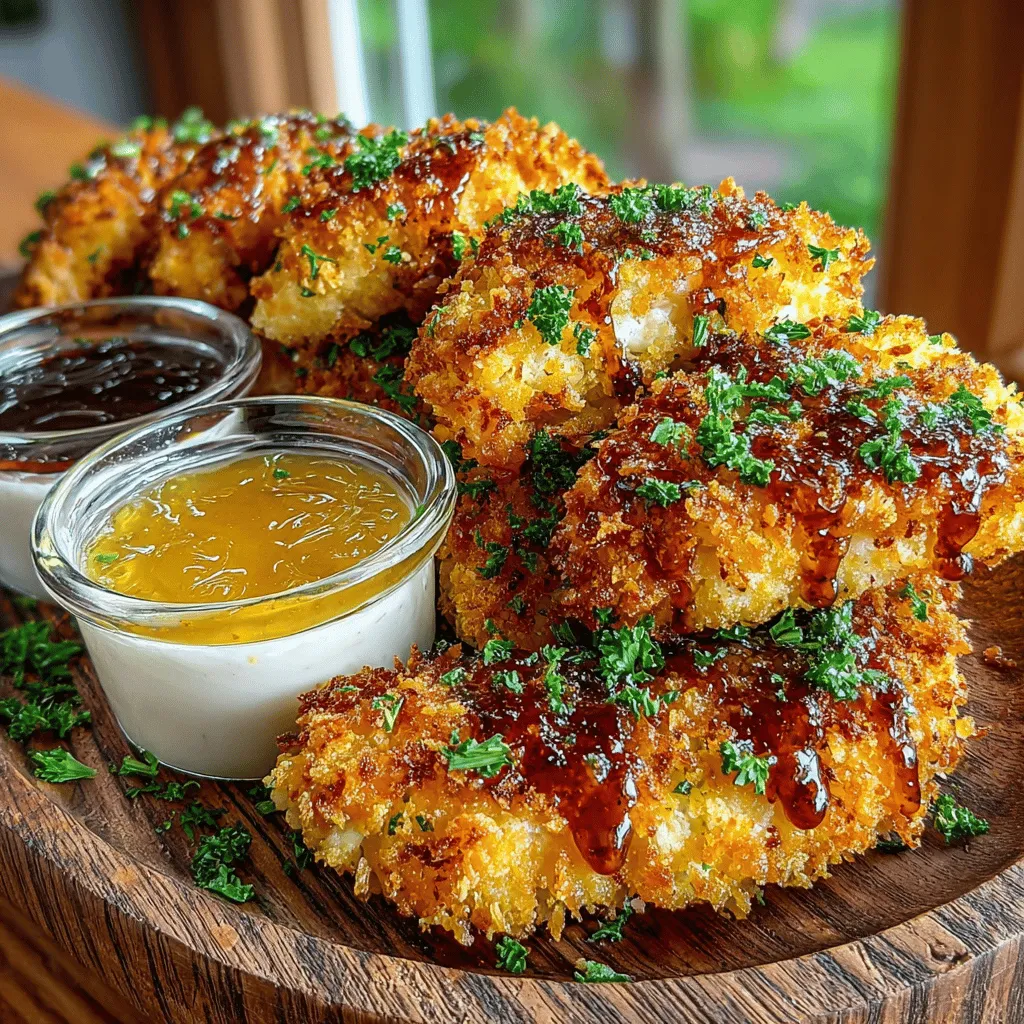
No chicken tender experience is complete without a delicious dipping sauce. The honey mustard dip is a perfect accompaniment to the Crunchy Delight Chicken Tenders, adding a sweet and tangy component that perfectly balances the savory flavors of the chicken.
This dip is incredibly easy to make and consists of just a few simple ingredients: Dijon mustard, honey, and a splash of vinegar for acidity. The combination creates a rich and creamy sauce that enhances each bite of the chicken tenders. The sweetness of the honey paired with the sharpness of the mustard provides a delightful contrast that will have everyone reaching for more.
Marination Process
Now that we’ve covered the essential ingredients, it’s time to delve into the marination process, which is crucial for achieving the ideal chicken tenders. Start by cutting the chicken breasts into strips, ensuring they are uniformly sized for even cooking. Place the chicken in a bowl or a resealable plastic bag, and pour in the buttermilk. Make sure the chicken is fully submerged for optimal tenderness.
For added flavor, you can mix in spices like garlic powder, paprika, and a pinch of salt into the buttermilk. Seal the bag or cover the bowl and refrigerate. It’s recommended to allow the chicken to marinate for at least one hour, but for the best results, aim for a minimum of four hours or even overnight. This extended marination time allows the chicken to absorb all the flavors and ensures a tender texture.
After marinating, remove the chicken from the buttermilk and let any excess liquid drip off. This step is crucial, as it helps the breading adhere better during the cooking process. Pat the chicken strips dry with paper towels to ensure they are not overly wet, which could lead to a soggy coating.
With the chicken tenderly marinated and ready for breading, you are well on your way to creating a delicious and satisfying dish that will be a hit at any meal. Stay tuned for the next part of the recipe, where we’ll cover the breading process and cooking methods that will bring these Crunchy Delight Chicken Tenders to life.
Setting Up the Breading Station
Creating a well-organized breading station is essential for making Crunchy Delight Chicken Tenders. A streamlined process not only saves time but also ensures that each chicken strip receives the attention it deserves for a crispy exterior. Here’s how to set up your breading station effectively:
1. Gather Your Ingredients: Start by placing the raw chicken tenders on one side of your workstation. On the other side, prepare three shallow bowls or plates: one for all-purpose flour, one for beaten eggs, and one for panko breadcrumbs mixed with any desired seasonings, such as garlic powder, onion powder, and paprika.
2. Prepare the Flour: In the first bowl, add about a cup of all-purpose flour. Season it lightly with salt and pepper to enhance the flavor of the chicken. This initial coating of flour helps to dry the surface of the chicken, allowing the egg wash to adhere better.
3. Egg Wash: In the second bowl, beat 2-3 eggs until the yolks and whites are fully combined. You can add a splash of water or milk to make the mixture slightly thinner, which helps the breadcrumbs stick more effectively during the breading process.
4. Panko Mixture: In the final bowl, pour in about 1-2 cups of panko breadcrumbs. For an extra flavor boost, consider adding Parmesan cheese, herbs, or spices. The panko will provide that signature crunch that elevates your chicken tenders.
5. Arrange the Bowls: Place the bowls in order from left to right: flour, egg wash, and panko. This arrangement allows you to move seamlessly from one step to the next without cross-contaminating your ingredients.
This organized approach not only simplifies the breading process but also ensures that each piece of chicken is coated evenly, maximizing the crunchy texture that you desire.
Breading Techniques for Perfect Crunch
Breaded chicken tenders are all about technique. Follow these steps to achieve a perfectly crunchy coating:
1. Dredge in Flour: Take a chicken tender and coat it in the flour mixture. Make sure to shake off any excess flour; a light coating is all you need. This step is crucial as it prepares the chicken for the egg wash.
2. Dip in Egg Wash: Next, transfer the floured chicken into the bowl of egg wash. Ensure the tender is fully submerged, allowing the egg to coat it evenly. This layer binds the breadcrumbs to the chicken and adds moisture.
3. Coat with Panko: Now comes the magic of the panko breadcrumbs. Place the egg-coated chicken in the third bowl and press down gently into the breadcrumbs. Ensure that the panko adheres well by pressing the breadcrumbs onto the surface of the chicken. This step is vital; a good pressing creates an extra crunchy exterior when fried.
4. Repeat: Continue this process until all your chicken tenders are breaded. As you finish, lay the breaded tenders on a wire rack or a parchment-lined baking sheet. This prevents them from sticking together and allows any excess breadcrumbs to fall away.
These breading techniques are designed to create a deliciously crunchy coating that will enhance the overall texture and flavor of your chicken tenders.
Frying the Chicken Tenders
Frying is where the magic happens, transforming your breaded chicken into golden, crunchy delights. Follow these steps for optimal frying:
1. Heat the Oil: In a large, deep skillet or pot, heat about 1-2 inches of vegetable oil over medium-high heat. The oil should reach a temperature of around 350°F (175°C). You can use a kitchen thermometer to check this, or drop a small piece of bread into the oil; if it bubbles and sizzles, it’s ready.
2. Fry in Batches: To achieve an even golden color and crispy texture, it’s essential to fry the chicken tenders in batches. Avoid overcrowding the pan, as this can lower the oil temperature and lead to soggy tenders. Fry about 3-4 tenders at a time, depending on the size of your skillet.
3. Cooking Time: Fry each batch for about 4-5 minutes per side, or until they are golden brown and cooked through. Use tongs to flip the tenders gently to avoid breaking the crust.
4. Drain Excess Oil: Once cooked, transfer the tenders to a paper towel-lined plate to drain any excess oil. This ensures that they remain crispy and not greasy.
Frying at the right temperature and in manageable batches is key to achieving perfectly cooked chicken tenders with a satisfying crunch.
Signs of Perfectly Cooked Chicken Tenders
Knowing when your chicken tenders are perfectly cooked is essential for both taste and safety. Here are the indicators to watch for:
1. Golden Brown Color: The exterior should be a beautiful golden brown, signaling that the breading is crisp and cooked to perfection.
2. Texture: When you tap a tender, it should feel firm and sound crunchy. A soft or spongy texture indicates undercooking, while an overly hard texture may suggest overcooking.
3. Internal Temperature: The internal temperature of the chicken should reach at least 165°F (75°C) for safe consumption. You can check this with a meat thermometer inserted into the thickest part of the tender.
4. Juices Run Clear: When you cut into a tender, the juices should run clear, with no pink remaining. This is a good visual indicator of doneness.
By observing these signs, you can ensure that your chicken tenders are not only safe to eat but also perfectly delicious.
Making the Honey Mustard Dip
No chicken tender experience is complete without a delectable dip. Here’s how to prepare a simple yet flavorful honey mustard dip:
1. Gather Ingredients: You will need 1/2 cup of mayonnaise, 1/4 cup of Dijon mustard, and 1/4 cup of honey. Feel free to adjust these measurements to suit your taste preferences.
2. Mix Ingredients: In a small bowl, combine the mayonnaise and Dijon mustard. Whisk them together until smooth.
3. Add Honey: Slowly incorporate the honey, whisking until well combined. Taste the dip and adjust the sweetness by adding more honey if desired or adjusting the mustard for extra tang.
4. Chill: For the best flavor, refrigerate the dip for at least 30 minutes before serving. This allows the flavors to meld beautifully.
This honey mustard dip is versatile and can also be used for other dishes, such as salads or as a spread for sandwiches, making it a great addition to your culinary repertoire.
Serving Suggestions
How you present your Crunchy Delight Chicken Tenders can enhance the overall dining experience. Here are some serving suggestions:
1. Plating Ideas: Arrange the chicken tenders on a large platter, garnished with fresh parsley or a sprinkle of paprika for a pop of color. Serve the honey mustard dip in a small bowl in the center for easy access.
2. Side Dishes: Pair your chicken tenders with classic sides such as crispy French fries, a fresh garden salad, or roasted vegetables. For a healthier option, consider serving them with steamed broccoli or a quinoa salad.
3. Dipping Variety: In addition to the honey mustard dip, offer a selection of other dips like barbecue sauce, ranch dressing, or spicy sriracha for a fun and interactive meal.
These serving suggestions not only elevate the presentation of your chicken tenders but also encourage a communal dining experience that is perfect for family dinners or gatherings with friends.
Nutritional Considerations
Understanding the nutritional value of your homemade chicken tenders can help you make mindful choices. Chicken tenders are a good source of protein, providing essential amino acids necessary for muscle growth and repair. Here are some key points to consider:
1. Protein-Packed: A typical serving of chicken tenders contains about 25 grams of protein, making them an excellent option for a post-workout meal or a satisfying dinner.
2. Balanced Meal: To make this dish fit into a balanced diet, pair it with whole grains like brown rice or quinoa and plenty of vegetables. This combination will provide fiber, vitamins, and minerals to round out your meal.
3. Healthier Substitutions: For a lighter version, consider baking the chicken tenders instead of frying them. You can also use whole wheat panko breadcrumbs for added fiber and nutrients or opt for skinless chicken breast for lower fat content.
4. Portion Control: Keep portion sizes in mind when serving. Enjoying these tenders with a side of veggies can help you enjoy the flavor while maintaining a balanced diet.
These nutritional considerations make Crunchy Delight Chicken Tenders a versatile dish that can fit into various dietary preferences and health goals.
Conclusion
Homemade Crunchy Delight Chicken Tenders are a delightful treat that brings together the joy of cooking and the satisfaction of sharing delicious food with loved ones. With a simple yet effective breading process, careful frying techniques, and a flavorful honey mustard dip, this recipe is sure to become a favorite in your household.
The appeal of these chicken tenders lies not only in their crispy texture and savory flavor but also in the memories created around the dinner table. Whether you’re serving them for a weeknight dinner, a game day snack, or a family gathering, the joy of enjoying homemade chicken tenders is unmatched.
So roll up your sleeves, set up your breading station, and dive into the delightful world of Crunchy Delight Chicken Tenders. With this recipe, you’ll find that creating restaurant-quality food at home is not only possible but also incredibly rewarding. Enjoy every crispy bite!
