Introduction
In the realm of healthy snacking, few combinations can rival the delightful pairing of creamy hummus and crunchy pita chips. Our Garlic Bliss Hummus recipe elevates this classic dish by infusing it with the rich, aromatic flavor of roasted garlic, creating a truly indulgent experience that is both nutritious and satisfying. Whether you’re hosting a gathering, preparing for a game night, or simply looking for a wholesome snack, this recipe is bound to impress your family and friends.
Hummus has transcended its Middle Eastern origins to become a beloved staple in kitchens around the globe. Its creamy texture and versatile flavor profile make it an ideal dip for vegetables, crackers, and, of course, pita chips. The beauty of making hummus at home lies in the ability to customize it to your taste. By using fresh ingredients and simple techniques, you can create a version that not only tastes better than store-bought options but also aligns with your dietary preferences.
As we embark on this culinary journey, we will take you through the step-by-step process of creating Garlic Bliss Hummus, starting with the roasting of garlic to unlock its deep, savory essence. Alongside, we will guide you in crafting homemade pita chips that are crisp, flavorful, and free from preservatives. Together, these elements create a snack that is not only delicious but also packed with health benefits.
The Allure of Garlic Bliss Hummus
Understanding Hummus: A Brief History and Popularity
Hummus, derived from the Arabic word for chickpeas, has been a staple in Middle Eastern cuisine for centuries. Its popularity has surged in recent years, making it a favorite among health-conscious eaters worldwide. Traditionally made from blended chickpeas, tahini, olive oil, lemon juice, and garlic, hummus is a versatile dish that can be enjoyed in numerous ways—spread on sandwiches, served as a dip, or even used as a salad dressing.
The appeal of hummus lies not only in its flavor but also in its adaptability. Chefs and home cooks alike have experimented with various ingredients, leading to an explosion of flavors—from roasted red pepper to spicy harissa. However, our Garlic Bliss Hummus stands out by celebrating the robust flavor of garlic, combining it harmoniously with the creamy chickpeas to create a dip that is both satisfying and enriching.
Nutritional Benefits of Chickpeas: Why They’re a Superfood
Chickpeas, the cornerstone of hummus, are often celebrated as a superfood for good reason. Packed with protein, fiber, and essential vitamins and minerals, chickpeas contribute to a balanced diet. They are an excellent source of plant-based protein, making them a great option for vegetarians and vegans. Additionally, the high fiber content promotes digestive health and helps to keep you feeling full longer, making hummus an ideal healthy snack.
Incorporating chickpeas into your diet can also support heart health thanks to their low glycemic index, which helps regulate blood sugar levels. Plus, they are rich in essential nutrients such as folate, iron, and magnesium, making them a valuable addition to any meal plan.
The Power of Garlic: Health Benefits Beyond Flavor
Garlic is often hailed as a superfood in its own right, with a myriad of health benefits that extend well beyond its robust flavor. Known for its antibacterial and antiviral properties, garlic can boost your immune system and help ward off colds and infections. It is also rich in antioxidants, which can protect your body from oxidative stress and inflammation.
Moreover, garlic has been linked to heart health, with studies suggesting that it can help lower blood pressure and cholesterol levels. Its active compounds, such as allicin, are believed to contribute to these health benefits. By incorporating roasted garlic into our hummus, we not only enhance the flavor profile but also elevate the nutritional value of the dish.
Ingredients Breakdown
For the Roasted Garlic Hummus
To create the perfect Garlic Bliss Hummus, you’ll need the following ingredients:
– Chickpeas: The foundation of hummus, providing creaminess and protein.
– Roasted Garlic: Adds depth and a sweet, mellow flavor that complements the chickpeas.
– Tahini: A sesame seed paste that contributes to the creaminess and nutty flavor.
– Olive Oil: Enhances the texture and adds richness.
– Lemon Juice: Provides acidity to balance the flavors and brighten the dish.
– Salt and Pepper: Essential for seasoning and enhancing the overall taste.
Each ingredient plays a specific role in achieving the creamy texture and robust flavor of the hummus. The balance of these components is crucial for creating a dip that is not only delicious but also satisfying.
The Importance of Fresh Ingredients
When it comes to making hummus, the quality of your ingredients can significantly impact the final product. Opting for fresh, high-quality ingredients will result in a more flavorful and nutritious dish. For instance, using freshly roasted garlic rather than pre-packaged garlic powder can elevate the flavor profile and add that signature sweetness and depth.
Additionally, using high-quality olive oil will not only enhance the taste but will also provide health benefits. Extra virgin olive oil is rich in antioxidants and healthy fats, making it a smart choice for your hummus. Whenever possible, choose organic chickpeas and fresh lemons to ensure that your Garlic Bliss Hummus is as wholesome as it is delicious.
For the Pita Chips
To accompany your hummus, homemade pita chips are a must. Here are the ingredients you’ll need:
– Pita Bread: The base for your chips. You can choose either whole wheat or white pita bread depending on your preference.
– Olive Oil: To brush on the pita for added flavor and crispiness.
– Seasonings: Common choices include garlic powder, paprika, and sea salt, which will enhance the flavor of the chips.
When selecting pita bread, consider the type that best aligns with your dietary goals. Whole wheat pita offers additional fiber and nutrients, making it a healthier option. The choice of seasonings can also be tailored to your taste, allowing you to experiment with different flavor profiles and create a snack that suits your palate.
Step-by-Step Guide to Making Garlic Bliss Hummus
Roasting the Garlic
The first step in creating our Garlic Bliss Hummus is roasting the garlic, which transforms its sharp and pungent flavor into a sweet and mellow one. Here’s how to achieve perfectly roasted garlic:
1. Selecting the Garlic: Choose firm, unblemished heads of garlic. Look for garlic that feels heavy for its size, indicating that it is fresh.
2. Preparation: Preheat your oven to 400°F (200°C). To prepare the garlic, slice off the top of the garlic head to expose the individual cloves. Drizzle with a little olive oil and wrap it in aluminum foil.
3. Roasting: Place the wrapped garlic on a baking sheet and roast for about 30-35 minutes, or until the cloves are soft and golden brown. The aroma will fill your kitchen, signaling that you’re on the right path to creating a flavorful hummus.
4. Cooling: Allow the roasted garlic to cool slightly before handling. Squeeze the cloves out of their skins into a bowl, ready to be blended with the other ingredients.
By following these steps, you’ll unlock the full potential of garlic, setting the stage for a rich and flavorful hummus that will leave your taste buds craving more.

Blending the Hummus
Once you have prepared your ingredients, the next step is to bring them together into a creamy blend that will become your Garlic Bliss Hummus. Start by placing the chickpeas, tahini, garlic, lemon juice, olive oil, and a pinch of salt into a high-speed blender or food processor. It’s essential to blend these ingredients thoroughly to achieve that signature smooth texture.
Achieving the Perfect Consistency
As you begin blending, you may notice that the mixture is quite thick. To achieve the perfect consistency, gradually add ice-cold water, one tablespoon at a time. This step is crucial as the cold water will help to create a creamy, light hummus. Continue blending until the hummus reaches your desired smoothness. If you prefer a chunkier texture, stop blending sooner. Remember, the goal is to find a balance that suits your taste—creamy yet not overly thick.
Adjusting Flavors: Balancing Seasoning and Acidity
Once you have your base hummus blended, it’s time to taste and adjust the flavors. You may want to enhance the saltiness, acidity, or garlic flavor. Start by adding more salt, lemon juice, or garlic powder according to your preference. Blend again after each addition, tasting until you reach the perfect balance. Keep in mind that flavors can develop as the hummus sits, so it’s wise not to over-season in this step. A little drizzle of olive oil on top before serving can also enhance the flavor profile.
Preparing the Pita Chips
While your hummus is blending to perfection, you can turn your attention to the crunchy pita chips. Homemade pita chips are simple to make and add a delightful texture to your Garlic Bliss Hummus.
Baking Techniques for Optimal Crispiness
To prepare the pita chips, start by preheating your oven to 375°F (190°C). Take your pita bread and cut it into triangles or strips, depending on your preference. In a large mixing bowl, toss the pita pieces with olive oil, ensuring they are evenly coated. For added flavor, consider sprinkling them with salt, garlic powder, or even a pinch of paprika for a smoky kick.
Arrange the pita pieces in a single layer on a baking sheet. Avoid overcrowding to help them crisp up. Bake in the preheated oven for about 10-15 minutes, flipping halfway through for even browning. Keep a close eye on them as they can burn quickly. The chips are ready when they are golden and crispy, perfect for dipping into your hummus.
Flavoring Variations: Exploring Other Seasonings
While the basic pita chip recipe is delicious on its own, you can experiment with various seasonings to make them even more enticing. Consider adding dried herbs such as oregano, thyme, or rosemary for an herby twist. You can also use za’atar, a Middle Eastern spice blend, for a unique flavor profile. Adjust the seasoning to match your personal taste or the occasion, making your hummus and pita chip experience even more delightful.
Serving Suggestions
Once your Garlic Bliss Hummus and pita chips are ready, it’s time to present this dish beautifully for your guests.
Presentation Tips for Hummus: Making It Instagram-Worthy
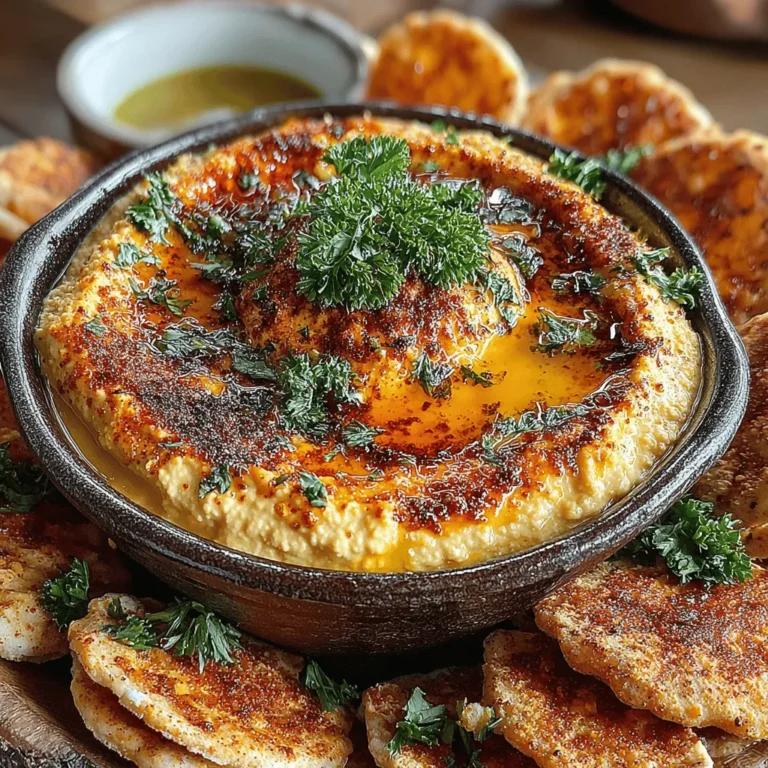
To make your hummus visually appealing, transfer it to a shallow serving bowl. Create a small well in the center and drizzle with high-quality extra virgin olive oil. You can also sprinkle some paprika or smoked paprika on top for a pop of color. Fresh herbs, such as chopped parsley or cilantro, can also enhance the visual appeal and add freshness to the dish. Serve with your crunchy pita chips arranged around the bowl for easy dipping.
Pairing Ideas: What to Serve with Garlic Bliss Hummus
Garlic Bliss Hummus is versatile and pairs well with various accompaniments. Consider serving it with a colorful array of fresh vegetable sticks, such as carrots, celery, cucumber, and bell peppers for a healthy platter. Olives, pickles, or marinated artichokes can also provide a delightful contrast to the creamy hummus. For a refreshing touch, consider including a side salad with herbs and lemon vinaigrette.
Storage Tips: How to Keep Hummus Fresh
If you have leftovers, storing your Garlic Bliss Hummus is straightforward. Transfer it into an airtight container and pour a thin layer of olive oil on top to prevent it from drying out. Stored in the refrigerator, your hummus should stay fresh for up to five days. For longer storage, consider freezing it. When freezing, use a freezer-safe container and leave some space for expansion. Thaw in the refrigerator when ready to enjoy again.
The Health Benefits of Garlic Bliss Hummus and Pita Chips
Garlic Bliss Hummus is not only delicious but also packed with health benefits, making it an excellent addition to your diet.
Nutritional Analysis of the Recipe
The primary ingredients of this hummus—chickpeas, tahini, garlic, and olive oil—contribute to its nutritional value. Chickpeas are high in protein and fiber, promoting satiety and digestive health. Tahini, made from ground sesame seeds, is rich in healthy fats and essential minerals like calcium and iron. Garlic is known for its immune-boosting properties, while olive oil is packed with antioxidants and anti-inflammatory compounds.
Calories and Macronutrients Overview
A standard serving of Garlic Bliss Hummus (about two tablespoons) contains approximately 70-100 calories, depending on the amount of olive oil used. It typically offers around 3-4 grams of protein, 5-7 grams of fat (mostly healthy fats from tahini and olive oil), and 4-5 grams of carbohydrates. The accompanying pita chips will add additional calories, but when made with whole grain pita bread, they can also provide fiber and whole grains.
Health Benefits Linked to Ingredients
– Chickpeas: Support weight management, heart health, and digestive health due to their high fiber and protein content.
– Garlic: Known to lower blood pressure and cholesterol levels, contributing to cardiovascular health.
– Tahini: Provides healthy fats that can help with nutrient absorption and adds a creamy texture to dishes.
– Olive Oil: Rich in monounsaturated fats, it is beneficial for heart health and has anti-inflammatory properties.
Incorporating This Recipe Into a Balanced Diet
Garlic Bliss Hummus can easily be incorporated into a balanced diet. It makes an excellent snack option, allowing for healthy munching without the guilt. Pair it with your favorite veggies or pita chips for a nutritious afternoon snack or enjoy it as a part of a meal.
Healthy Snacking for All Ages
This recipe is suitable for all age groups, from young children to adults. Its wholesome ingredients make it an excellent option for a family snack. Encourage kids to dip fresh vegetables into hummus for a fun and healthy eating experience. For adults, it serves as a nutritious appetizer at gatherings or a satisfying addition to lunchboxes.
Conclusion
Garlic Bliss Hummus with crunchy pita chips is more than just a snack; it’s a flavorful, nutritious option that can fit seamlessly into a variety of diets. With its creamy, rich texture and the delightful crunch of homemade chips, this recipe is sure to impress family and friends alike. As you enjoy this dish, you can feel good knowing it is made from wholesome ingredients that contribute positively to your health. Embrace the joy of cooking and the satisfaction of creating something delicious and healthy right in your own kitchen.
Whether you’re hosting a gathering, preparing a family meal, or simply indulging in a snack, Garlic Bliss Hummus and crunchy pita chips will elevate your culinary experience. Try this recipe today and discover a new favorite that nourishes your body and pleases your palate.


